

| Inma Sevila |
|
| THE ORIENTATION AND DIRECTION OF A FORCE | |
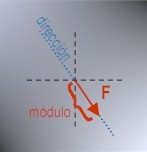
| The use of arrows as illustrations to represent forces gives us the possibility of representing more than just their module. | |
|
An object on a horizontal board is subject to the action of two springs. (See simulation) 1- Click on the object and and place it on the point (0.0 , 2.4) . To fix its position you can use the arrow keys on the keyboard. Click on "play" (release the object). 2- Click on "Init", place the red object on the point (1.0, 2.4). Observe. 3- Click on "Init" again. Work with the visual changing the initial positions of the object and try to analyse the effect this produces. | |
|
Consider 1. What do you think determines the different responses you have observed in the objects? 2. What do the lines that appear in the visual symbolize? 3. Start the visual and place the object in any position. Before clicking on "play" give a qualitative indication of the direction in which the object will move. 4. Find some situation in the visual where the object will stay at rest (velocity=zero). | |
|
Learn Forces are represented by arrows. The information they provide is: The size of the arrow is proportional to the module, so that the greater the force the longer the arrow. The orientation with which the force is applied is the straight line which contains the arrow and the direction is indicated with its point. |
 |